Friday, February 20, 2015

How to get Moto E Android Update


IMPORTANT: The latest version of Motorola Update Services is required if you're a Moto E owner and want to receive the Lollipop update. Make sure you have the latest version by clicking the button below.
I will have more for you on the status of the Motorola Moto E update as I get it. Are you excited to receive Lollipop on your Moto E? 

How to Flash Custom Recovery and Root Motorola Moto E with Screenshots

STEPS:

  1. Download SuperSU from HERE.
  2. Connect your device in normal mode with USB.
  3. Copy the SuperSu zip file in the internal storage of your device.
  4. Power off the device.
  5. Download Moto E CMW recovery from HERE.
  6. Copy the recovery.img file in 
    • C:\Program Files (x86)\Minimal ADB and Fastboot\ if you have used my Minimal ADB and FASTBOOT method.
    • C:\android-sdk\platform-tools\ if you have used my Android SDK method for ADB.
  7. Put your device in fastboot mode [ Power off, then press the power and volume down buttons simultaneously ]. 
  8. Open command prompt either by
    • Open desktop icon of Minimal ADB and FASTBOOT if you have that.
    • If you have Android SDK then go to "C:\android-sdk\platform-tools\" open command prompt by holding shift and right click and press command window here.
  9. In command prompt type fastboot flash recovery recovery.img 
  10. Push volume down to select recovery on the device and Push volume up to select it. 
  11. Now that you are in recovery, choose Install from sdcard using the volume buttons to navigate and power to select. 
  12. Select Install zip from sdcard  then select 0. 

  13. Select the SuperSU zip file and flash it. 

  14. Select advanced then reboot to bootloader. 


  15. Select No if asked to Fix the SuperSU issue. 
  16. Now as Step 9 we will repeat as we have now root access so it will still this time, In command prompt type fastboot flash recovery recovery.img 
  17. Select Normal Powerup on the device. 

After the device boots up you will see SuperSU in Applications menu.

To check that we have root access or not follow this:
  1. Open play store.
  2. Search for Root Checker.
  3. Install and Open it.
  4. Tap on Verify Root.
  5. Tap on Grant.
  6. If it says congrats then your device is rooted.

How to Unlock Bootloader of Moto E with Screenshots

CAUTION: UNLOCKING YOUR BOOTLOADER WILL VOID YOUR WARRANTY. PROCEED AT YOUR OWN RISK.

CAUTION: UNLOCKING THE BOOTLOADER WILL WIPE / FACTORY RESET YOUR DEVICE. IT WILL DELETE EVERYTHING FROM YOUR DEVICE

STEP: 
  1. Take full backup of your device.
  2. Install the latest Motorola USB drivers with the help of this tutorial HERE.
  3. Choose either
    • [ Recommended ] Download Minimal ADB and FASTBOOT and set up from my tutorial HERE.
    • Download Android SDK and set up from my tutorial HERE.
  4. Put your device in fastboot mode [ Power off, then press the power and volume down buttons simultaneously ]. 
  5. Open command prompt either by 
    • Open desktop icon of Minimal ADB and FASTBOOT if you have that.
    • If you have Android SDK then go to "C:\androidsdk\platform-tools\" open command prompt by holding shift and right click and press command window here.
  6. Connect your device to pc in USB DEBUGGING mode. If you don't know how to do that than follow this tutorial HERE.
  7. Now type this in command prompt fastboot oem get_unlock_data 
  8. A string will appear on command prompt . Copy the whole string. 
  9. Paste the string in notepad and remove empty spaces such that the whole string is in single line. 

  10. Next, go HERE and sign in using your google account or Motorola ID; Scroll down and copy paste the string from step 9. Now click on "Can my device be unlocked?". A REQUEST KEY button will appear. 

  11. Check I Agree option. After this you will receive an email ( on email id you used while signing in ) containing your unlock key. 
  12. Copy the string form the email received from Motorola. Make sure the device is still connected. 
  13. Now to check the connection type in command prompt fastboot devices.
  14. Now type fastboot oem unlock KEY and hit enter. [ IMP: Replace KEY with the sting from email ] 
  15. Wait till Bootloader unlocked warning appears in your MOTO E. 
In case in future if you want to Relock your Bootloader, than you can do it by doing this:

Go to Fastboot and give the command fastboot oem lock

How to enable DEVELOPER OPTIONS and put any Android Device in USB DEBUGGING mode

STEP: 1 Enabling Developer Options

To enable the Developers Options you need to find the Build Number option in settings menu on your device and tap on it for 7 times.

For example on Moto E go to : Settings > About phone > Build number


STEP: 2 Turning On Usb Debugging Mode

Now that you have enabled Developer Options, it will appear in your device settings. Tap on it and turn it on. And search for Usb Debugging in the list below, some warning will pop up, its no issue just tap on Okay. 


Its done!

Thursday, February 19, 2015

How to Download Android SDK and use it for ADB and FASTBOOT

STEPS :

  1. Click HERE to visit Android SDK site for download.
  2. Scroll down till "SDK Tools Only".
  3. Download the recommended .exe file.
  4. Terms and Conditions page will appear, Check on i have read and download.
  5. Go through installation steps, when it asks for installation make sure it is c:\android-sdk\ .
  6. Continue till installation is complete and then check the box that says Start SDK Manager and hit Finish.
  7. When it opens, check off Tools (and make sure it selects everything underneath it) then hit Install X Packages.
  8. Accept the any licenses it asks you to and let it continue until it installs everything (might take a while).
  9. Next go to my tutorial HERE to install ADB drivers. Come back here after completing this step.
  10. Keep device connected in USB DEBUGGING mode.
  11. Now go to c:\android-sdk\platform-tools\
  12. On any blank spot hold shift and right click inside the platfrom-tools folder, click on open command prompt here.
  13. Type this in command prompt and hit enter : adb devices
A message saying "list of connected devices" will appear, under it will be serial number its the serial number of your device.

If you do not see the serial number, then you have not installed ADB drivers properly. Go through Step 9 again.

    Tuesday, February 17, 2015

    How to Install Minimal ADB and Fastboot for Android Device in Windows XP / 7 / 8 / 8.1 [ 2 MB size compared to 500 MB Android SDK ]


    ADB and Fastboot are two of the most important tools used while working with Android devices. If you want to modify, debug, and tweak along with their awesome uses in rooting, and other procedures ADB and Fastboot are a must for any Android device owner. Normally if you want to install ADB and Fastboot you have to download and setup the Android SDK (If you really want to learn about Android Development I highly recommend downloading and installing the full Android SDK from here), but this can be unnecessary for people who just want to install ADB and Fastboot. The total installation of Minimal ADB and Fastboot is around 2 MB in size (Compared to the 90+ MB size of the Android SDK Tools, and 425+ MB size of the complete Android SDK) making it very lightweight.

    STEPS :

    1.    Download the .exe file from below link.
    2.    Follow the instructions and select where you would like to install (Example: Desktop).
    3.    Connect your device to computer with USB cable.
    4.    Now in your device turn on Developer Options (Setting -> Developer Options).
    5.    In Developer Options list, mark the check box “USB Debugging”.
    6.    Start Minimal ADB and Fastboot.
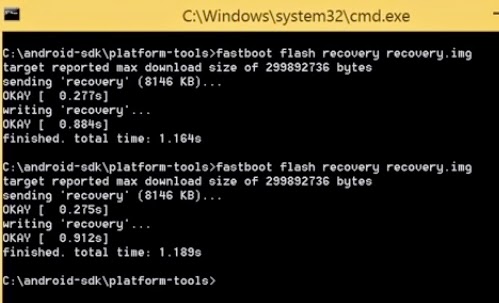
    7.    You should now see a command window open.
    8.    With the command window open you can now issue ADB and Fastboot commands to your device.


    How to Install any Motorola Device MTP USB Drivers in Windows xp / 7 / 8 / 8.1 and Mac OS

    It’s a really easy process to install USB Drivers for Motorola devices; we are going to do it with the help of Motorola Device Manager. Motorola Device Manager contains USB drivers and software to connect your Motorola devices to your computer using a USB cable.


    1.      Download Motorola Device Manager from HERE.
    2.      Go through the process of installing the software.
    3.      Once installed you don’t need to open the software.
    4.      Just connect your device with USB, and it installs the drivers automatically. VoilĂ ! 


    Contact Form

    Name

    Email *

    Message *